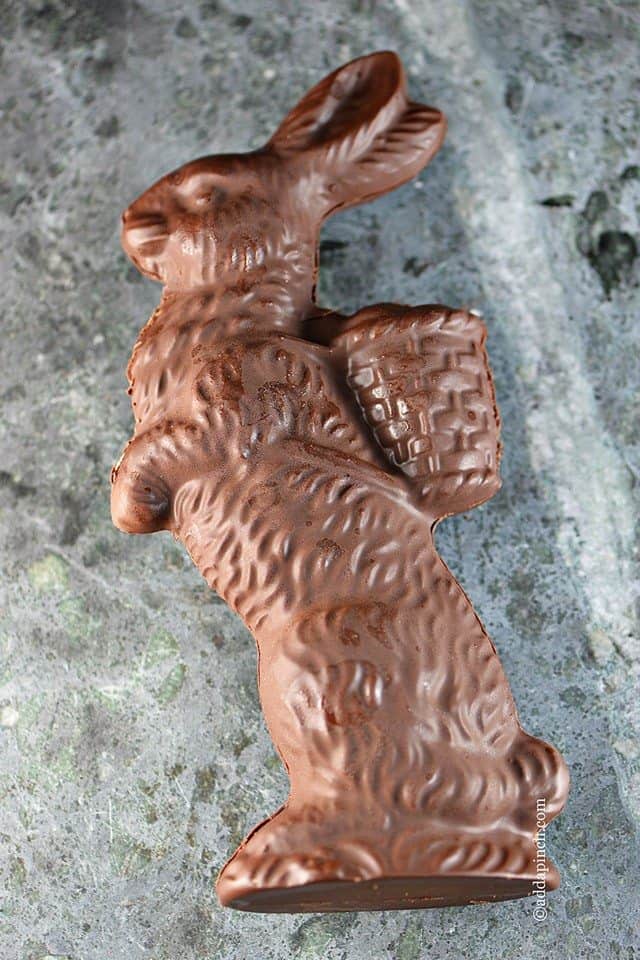
The arrival of spring and the Easter season often brings with it cherished family traditions, and for many, a chocolate bunny is at the heart of the celebration. While store-bought options are plentiful, there's a unique charm and satisfaction in crafting your own edible works of art. Imagine the delight of presenting a homemade chocolate bunny, perfectly molded and glistening, a testament to your culinary creativity. This comprehensive guide will walk you through everything you need to know about how to make chocolate bunny masterpieces right in your own kitchen, focusing on achieving flawless results and perfect molds every time.
Making your own chocolate bunnies might seem daunting at first, but with the right ingredients, tools, and techniques, it’s a surprisingly accessible and rewarding project. We'll demystify the process, from selecting the best chocolate to expertly releasing your sweet creations, ensuring your homemade bunnies are not just delicious, but also beautiful.
Gathering Your Bunny-Making Essentials
Before you dive into the magic of melting and molding, preparing your workspace and gathering the right materials is crucial. The quality of your ingredients significantly impacts the final product, so choose wisely.
- The Right Chocolate: While standard chocolate chips can work, opting for a higher-quality chocolate will elevate your bunnies. Brands like Merckens, often praised by experienced candy makers, are specifically designed for melting and molding, offering superior consistency and flavor compared to conventional baking chocolate. Look for compound chocolates or couverture with a higher cocoa butter content for a smoother melt and glossier finish. You can choose from milk, dark, white, or even flavored chocolates to suit any preference.
- A Touch of Smoothness: To ensure your chocolate melts into a luxuriously smooth, pourable consistency and to prevent it from seizing (becoming thick and grainy), a small amount of vegetable shortening or coconut oil is your secret weapon. This helps thin the chocolate slightly, making it easier to work with, especially when filling intricate molds.
- Your Bunny Molds: These are the stars of the show! You can find a wide variety of bunny-shaped candy molds at craft stores like Hobby Lobby, major retailers like Walmart or Target, or online. Molds come in various materials, including plastic and silicone. Plastic molds often provide a crisper detail, while silicone offers easier demolding. If using two-part molds, ensure you have appropriate clips to hold them firmly together.
- Essential Tools: Arm yourself with microwave-safe bowls (preferably with a pour spout for easier handling), a small rubber spatula, a heat-proof bowl for a double boiler setup, a saucepan, and toothpicks or a thin skewer for addressing air bubbles. Having a clean, dry workspace is also non-negotiable, as even a tiny drop of water can cause chocolate to seize.
Mastering the Melt: Silky Smooth Chocolate Every Time
Achieving perfectly melted chocolate is the cornerstone of a successful chocolate bunny. Overheating or improper technique can lead to a dull finish, a grainy texture, or even burned chocolate. There are two primary methods for melting chocolate, each with its own nuances to master. For more in-depth guidance on achieving the perfect melt, explore our dedicated guide.
Microwave Melting Method
This method is quick and convenient but requires careful attention to prevent overheating. The key is gentle, gradual heating:
- Add Shortening: Before melting, incorporate a small amount of vegetable shortening or coconut oil (about 1 teaspoon per cup of chocolate) into your chocolate chips or chopped bar. This aids in achieving a beautifully smooth, pourable consistency and helps prevent seizing.
- Short Bursts: Place your chocolate in a microwave-safe bowl. Heat in very short intervals of 15-20 seconds at a time. This prevents localized overheating that can burn the chocolate.
- Stir, Stir, Stir: After each heating interval, remove the bowl and stir the chocolate thoroughly. This distributes the heat evenly throughout the mixture and helps melt any remaining chunks.
- Residual Heat is Your Friend: The most crucial tip! Remove the chocolate from the microwave when small chunks still remain, perhaps about 75-80% melted. Continue stirring vigorously; the residual heat from the melted chocolate will continue to melt the remaining pieces, bringing it to a perfect, smooth consistency without risk of burning.
- Avoid High Power: Always use a medium or even low power setting on your microwave. High power can quickly scorch chocolate, making it unusable.
Double Boiler Melting Method
For a more controlled and gentle melting process, the double boiler is ideal. This indirect heat method minimizes the risk of burning:
- Set Up: Place your chocolate (with shortening or coconut oil) in a heat-proof bowl that fits snugly over a saucepan without touching the water. Fill the saucepan with a couple of inches of water.
- Gentle Heat: Bring the water in the saucepan to a simmer (not a rolling boil). Once simmering, reduce the flame to medium-low to maintain a gentle heat.
- Stir Continuously: As the chocolate begins to melt from the steam, stir it thoroughly and continuously with your rubber spatula. The entire process is relatively quick, often taking just a few minutes to achieve a silky smooth texture. Ensure no water or steam gets into the chocolate, as this will cause it to seize.
Regardless of the method, always opt for fresh, high-quality chocolate. Older chocolate tends to have a drier texture and is more prone to seizing or having a dull finish.
The Art of Filling & Setting Your Molds
Once your chocolate is perfectly melted and shimmering, the next step is crucial for defining your bunny's form and capturing all the intricate details. Precision and speed are your allies here.
- Prepare Your Molds: If using plastic molds, some come with excess plastic that needs to be trimmed. Ensure you can place clips close to the bunny outline without accidentally cutting into the mold itself. This trimming allows for a tighter seal if you're joining two halves. While not strictly necessary for single-sided molds, a clean edge can be helpful for presentation.
- Fill with Care: Using a small rubber spatula or directly pouring from a bowl with a spout, gently place or pour the melted chocolate into your molds. Don't simply dump it in; aim for an even distribution.
- Combat Air Bubbles: As you fill, carefully look underneath the mold to see how the chocolate is settling. Air bubbles are the arch-nemesis of smooth chocolate surfaces. Use your spatula, a toothpick, or a thin skewer to gently push the chocolate into all crevices and corners, dislodging any trapped air. Lightly tapping the mold on your counter several times can also help air bubbles rise to the surface. Continue to watch for bubbles until you're confident the mold is completely filled.
- Work Quickly: Time is of the essence! You typically have a window of about 7-10 minutes before the chocolate starts to set and harden. Working efficiently ensures a seamless pour and prevents the chocolate from becoming too thick to properly fill the mold details.
- Allow to Set: Once filled, place your molds on a flat surface in a cool, dry place. The setting time will vary depending on the size of your mold and the ambient temperature. You’ll know they’re ready when the chocolate has fully hardened and appears matte, pulling away slightly from the mold edges.
For a comprehensive look at ensuring your chocolate creations are flawless, from selecting the right tools to perfecting every pour, explore our Craft Perfect Chocolate Bunnies: Easy Melting & Molding Guide.
Demolding and Finishing Touches
The moment of truth arrives when your chocolate bunny is ready to emerge from its cocoon. This step requires a gentle touch and a bit of patience.
- The Freezer Trick: To facilitate easy release, place your set chocolate bunnies (still in their molds) into the freezer for about 15-30 minutes. The cold temperature causes the chocolate to contract slightly, making it much easier to loosen from the mold without breakage. Be mindful not to leave them in for too long, as extreme temperature changes can sometimes lead to cracking or condensation.
- Careful Removal: Once chilled, gently flex the mold. If using plastic molds, you should see the chocolate detach from the sides. Carefully invert the mold and let the bunny fall out onto a clean, soft surface or your hand. Avoid forcing it, as this is when cracks or broken ears are most likely to occur. Silicone molds are typically more forgiving and allow for easy peeling away.
- Gifting and Decoration: Your beautiful homemade chocolate bunnies are now ready for their close-up! For gifting, wrap them individually in clear cellophane bags tied with a festive ribbon. You can also get creative with edible decorations – a touch of edible glitter, a small royal icing bow, or even painting on details with edible food pens can personalize your creations further.
Troubleshooting Common Chocolate Bunny Challenges
Even seasoned chocolatiers can encounter hiccups. Here's how to navigate common issues and ensure your journey to making chocolate bunnies is smooth:
- Seizing Chocolate: If your chocolate suddenly turns thick, grainy, and unworkable, it's likely seized. This usually happens when even a tiny drop of water or steam comes into contact with the melted chocolate. While often irrecoverable for molding, sometimes you can "rescue" it by stirring in a teaspoon of vegetable oil or melted shortening, one drop at a time, until it smooths out (though the texture might still be slightly off). Prevention is key: ensure all tools and bowls are completely dry.
- Persistent Air Bubbles: If tapping and stirring aren't quite doing the trick, try gently vibrating the mold (a vibrating massage tool can work wonders!) or using a thin skewer to poke into corners and along edges to release trapped air.
- Cracks During Demolding: This is often a sign of insufficient cooling or improper handling. Ensure your chocolate is fully set and has had enough time in the freezer to contract. When demolding, be extra gentle and avoid bending the mold too aggressively. Very thin sections, like bunny ears, are particularly susceptible.
- Dull or Streaky Finish: A beautiful sheen is highly desirable. A dull finish can result from chocolate that wasn't melted evenly, was overheated, or cooled too slowly. Ensure you use fresh, high-quality chocolate and follow the melting instructions carefully. Cooling the molds in a cool, consistent environment (not too warm, not too humid) helps achieve a glossy finish.
Creating your own chocolate bunnies is a delightful and achievable endeavor that adds a personal touch to any celebration. By focusing on quality ingredients, mastering the melting process, and paying attention to the details of filling and demolding, you’ll be crafting professional-looking, delicious treats in no time. So, gather your supplies, embrace the process, and get ready to impress with your homemade chocolate masterpieces. Happy Easter and happy chocolate making!
